tl;dr - You don't need fancy equipment or even a tidy living room to take a professional-looking flatlay photo. Read on for my step-by-step guide to easy DIY flatlay photography!
So...you want pretty flatlays?
Whether you're up-leveling your Instagram, building a brand, or documenting your everyday in style, you too can take professional-looking flatlay photos - and you won't need to hire a photographer or buy fancy equipment to do it. Read on to learn how!
Before we begin, below is the final photo from the step-by-step I’m about to outline in this post:
Disclaimer: I'm not a professional photographer, but I have a deep admiration (some would say obsession!) for pretty pictures. I have rough general ideas about what looks good and what doesn't look good, but that's about where my formal photography edumacation ends. It's all about practice and patience. If I can do it, you can too!
Step 1: Gather your stuff
- A room with natural light
- Camera (smartphone camera works great! I use a phone camera for all my photos.)
- Flat, matte background to shoot against
- Subject(s) to photograph
- Props
- Optional: scotch tape to keep round elements from rolling around
- Mobile apps for editing your photos
Here’s everything I used for the DIY in this post:
- Room: my super-messy living room (the natural light is the saving grace)
- Camera: Google Pixel
- Background: matte chalkboard background (the white side is the back of the chalkboard)
- Subjects: Laneige Lip Sleeping Mask, Water Sleeping Mask, and Multiberry Yogurt Mask
- Props: Capture Your Style coffee table book, Israeli ruscus foliage, iPhone 7
- Scotch tape (to keep my cylindrical subjects from rolling around)
- Apps: Foodie, VSCO, Snapseed, Facetune
On the left: My messy living room - still A-OK for taking clean-looking flatlay photos!
On the right: Everything I used for the flatlay in this tutorial
On the right: Everything I used for the flatlay in this tutorial
Step 2: Shoot your photos
Here are some tips to make your flatlay photo sesh fun, painless, and productive:
- Keep a steady hand. I rest my wrist on something stationary like a stool or a table when I shoot.
- Never shoot with flash. You don't need it when there's already natural light, and flash tends to flatten textures and produce harsh shadows.
- Turn off the "live" feature on iPhone. I’ve found it difficult to get as sharp of an image as I’d like when I use the “live” feature. You can turn this feature off by tapping the circular icon in the center of the top part of the native camera app. Make sure that icon is white, not yellow (yellow means it's on - at least for the iPhone 7! I can't speak for y'all early adopters of iPhone 8 and whatever newfangled technologies you kids are using at the time you're reading this).
- Shoot in HDR mode. HDR stands for "High Dynamic Range" and while I'm not familiar with the scientific details around why HDR photos turn out better, I just know they do. HDR photos have cleaner, more vivid details. Check out this blog post from Corel for more details on how HDR works. On iPhone 7, you can turn on HDR by tapping the “HDR” in the upper left part of your camera phone app - if the letters are yellow, HDR mode is on.
- Clean your lens. Before you shoot, gently wipe the lens with a soft cloth to get rid of dust debris.
- Shoot with a perfect flat angle using Foodie. The Foodie app has a built-in level that helps you get a perfectly flat, non-tilted angle. When you're perfectly level, the lower border turns yellow. It looks like this in action:

- Take many shots and experiment. Here are some elements you can change up:
- aspect ratios (vertical, horizontal, square)
- how close you are to your subjects when you take the photos
- shadow placement (I like to rotate my flatlay background to see what kinds of shadows I can get)
- placement of my subject and props
- number of props to include (note that an odd number of elements tends to look nicer in flatlays)

Step 3: Edit your photos
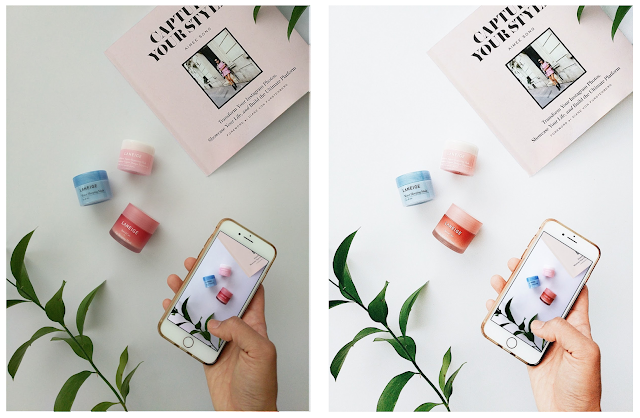
Once you have your photos, it's time to edit! Editing can make a big difference in the "wow" factor of your final flatlay. Check out my dramatic before-and-after from this DIY:

I love starting my edits in VSCO. I use the A6 filter and make adjustments in brightness, contrast, saturation, clarity, sharpness, and temperature until I'm happy with the look, and I feel like it's consistent with my blog and Instagram aesthetic.
Here’s my general VSCO editing formula (I almost always deviate from this, but this is where I start):
- A6 filter
- +2 Brightness
- -1 Contrast
- +2 Sharpness
- +1 Clarity
- +1 Saturation
- +1 Tint
As needed, I use Facetune to mask out stains in a solid background or clean up crumbs in food photos. I use the "Patch" tool for this - it's kind of like copying and pasting parts of your photo to patch up another part of your photo. I also use the “Details” tool sparingly to make textured details like leaves, flower petals, lettering, or jewelry stand out.
Step 4: Bask in your flatlay glory
Here’s the result of all the gathering, shooting, and editing I did to capture these Laneige skincare products:
And there you have it! I hope these tips help you take clean, professional-looking flatlay photos (and have some fun in the process!).
Again, I'm no expert - if I can do it, so can you. You don't need a ton of money to make beautiful flatlays, but practice, experimentation, and patience go a long way when it comes to photography of any kind. Maybe you start out taking 100 photos to produce one you're happy with - you'll start to generate more photos you like per session as you practice more!
Happy flatlay-ing!
Everything you need for a great flatlay: A breakdown
- A room with natural light
Take your photos in a room with at least one window that lets in natural light. I like to shoot within a few hours after sunrise or before sunset for filtered sunlight. - Camera
A smartphone camera works great! The vast majority of photos in my Instagram feed are taken with a smartphone camera. I use iPhone 7, the Google Pixel, and Samsung Galaxy S3. -
Flat, matte background
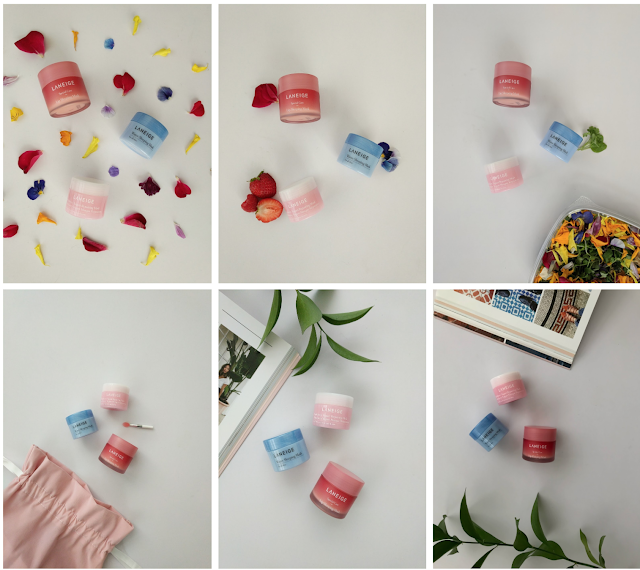
For the flatlay background, it's critical that this surface be matte, not shiny - a shiny flatlay surface will produce harsh shadows and reflections. Here are some ideas for inexpensive, easy-to-find flatlay backgrounds:- White foam board. It’s cheap and available everywhere. Cover the foam board with white parchment paper if you’re doing a flatlay with wet elements, e.g., cosmetic or skincare product drips, fresh fruits and vegetables. I took both photos below against a parchment-covered white foam board.
- Painted foam board. You can paint over a foam board with acrylic paint to create any solid color background you’d like. I recently salvaged a dirty foam board by painting it over the dirt with pink acrylic, and you can check out some of the photos I’ve taken with the painted board below.
- Chalkboard. I love this chalkboard from Amazon because it's dual-sided: black on the front, white on the back. I'm using the white side of the chalkboard for this post’s DIY. The front of the chalkboard comes in handy when I want a more interesting dark background - I use colored chalk to add texture to the chalkboard, especially for food glamour shots. See either side of the chalkboard and a food glamour shot against the dark side of the chalkboard below.
-
Wooden table or floor. I love the cozy, rustic feel of a wooden background. Plus, white/pale objects pop more against wood than they they do against a white background. The photos below were taken on two different wooden tables.
-
Marble contact paper-covered foam board. Real marble tends to be expensive, heavy, and too shiny. You can fake it by purchasing matte marble contact paper and covering a foam board with it, as I’ve done in both of the photos below.
- White bed sheet - the "breakfast in bed" look. I have a spare white flat bedsheet I keep folded in my closet, and I spread it out to take photos. No worries about wrinkles in the sheet - they add texture to your flatlay! Case in point below.
- White foam board. It’s cheap and available everywhere. Cover the foam board with white parchment paper if you’re doing a flatlay with wet elements, e.g., cosmetic or skincare product drips, fresh fruits and vegetables. I took both photos below against a parchment-covered white foam board.
I typically photograph sweets and skincare products! Sheet masks in particular are fun to photograph because there's so much surface area, and the packaging tends to be fun and creative.
Other ideas for subjects:
- folded-up clothing and shoes/accessories
- cosmetics and personal care products
- stationery, greeting cards, laptop/tablet, and office supplies
- luggage and transit accessories, e.g., passport wallet
- food, cooking tools, plates, and utensils
Props
Note that a lot of stuff I mentioned in the "subjects" section could also serve as props!
Here are some of my favorite flatlay props:
- hands in the shot (I like to wrap my hands around a coffee mug)
- tea or coffee in a cup with a saucer
- macaron cookies
- loose foliage like monstera leaves and Israeli ruscus which last a long time in water
- small potted plants - I like succulents and cacti
- flowers (I love fresh flowers, but they die quickly) – I keep some cheap silk flowers from the local crafts store on hand to add more volume to fresh flowers. I tend not to shoot with only silk flowers.
- cloth napkins or folded cloth to add texture (I keep a white pillowcase on hand for this purpose)
- coffee table books – staples include Capture Your Style by Aimee Song, cookbooks of all sorts, black and white magazines, newspapers in coffee / breakfast-in-bed shots
- if you need more elements in your photo, take a photo of the flatlay on another phone and display that phone with the photo in your final shot for some recursive / meta fascination


