THE JEN PROJECT

skincare, sweets, and Oxford commas

Image Slider

Tuesday, December 25, 2018

3-ingredient rose-shaped apple tarts


tl;dr - If you're short on time and ingredients but still want a showstopper dessert this season, look no further: these rose-shaped apple tarts come together quickly and with only three ingredients (recipe here). Hats off to Vivian of Mini Lyfe for the inspiration.


Merry Christmas! There's nothing more I want to do during the holidays than bake (last year, I indulged in festive holiday cacti and Christmas tree cookies). This year, unfortunately, our sink's out of commission, so washing butter-coated dishware isn't in the realm of possibility.

In lieu of buttercream flower cupcakes, I found a recipe for rose-shaped apple tarts on the blog Mini Lyfe. With only three ingredients (leaning on cinnamon roll dough from a can), the recipe is simple, and the only cleanup required is wiping apple juice off bowls and utensils with a damp cloth. Best of all, the tarts have been a hit at every holiday party I've taken them to this season. Not a bad way to keep baking before our sink gets fixed!


Things to keep in mind:
  • A mandolin makes it quick and easy to cut thin slices of apple, but be careful and wear a cut-proof glove to protect your fingers from the sharp mandolin blade.
  • The "Grands!" cinnamon rolls from Pillsbury tend to rise too much in the oven and cause the apple roses to get misshapen - look for the regular non-"Grands!" cinnamon rolls.
  • The cupcake liners are optional, but they make serving and cleanup easier.
Here's the recipe!

Rose-shaped apple tarts
inspired by Mini Lyfe

Ingredients for 12 cupcake-sized tarts:
  • 4 gala apples
  • 1 can of cinnamon roll dough (avoid Pillsbury "Grands!" - the regular Pillsbury cinnamon rolls work great)
  • A few spoonfuls of jarred applesauce
Equipment: Directions:
  1. Preheat oven to 325 degrees F (163 degrees C). Line cupcake pan with liners, if desired.
  2. Wash the apples. Core them but leave the skins on. Slice them in half lengthwise.
  3. Slice the apples into thin crescents. Feel free to use the mandolin with a cut-proof glove to get the slices very thin.
  4. Press the cinnamon roll dough into the cupcake tin, filling each cup about half way.
  5. Lay the apple slices onto a plate and microwave for 1 minute to soften slightly.
  6. Starting with the outermost layers of the rose, press the apple slices into the cinnamon roll dough as the "petals" of your rose, with the red peel facing up. Build the layers gradually inward, adding a dollop of apple sauce in the center to keep the inner slices in place. For the center, roll a slice into a spiral.
  7. Bake for 25-27 minutes. Look for golden-brown cinnamon roll dough.

In-process shots: Pressing the cinnamon roll dough into the cupcake pan and placing the apple slices to make roses.

The final product - ta da!
Sunday, November 25, 2018

Dessert for dogs: Buddy the Spoodle's peanut butter carrot cake with yogurt frosting


tl;dr - I baked a cake that's safe for dogs to eat. Here's the recipe.


This post is long overdue, as Buddy left the SF Bay Area for southern California over a year ago. Buddy's parents Kristine and Morten (y'all might remember the earl grey salty caramel cheesecake I made for their wedding last year) kindly invited me to their going away party at Crissy Field, so I took this opportunity to explore new territory in the kitchen: cake for dogs.

Until this party, I'd never baked for any species other than human. Some concerted Googling led me to discover many categories of human-food that are off-limits to dogs (the only one I'd known about beforehand was chocolate). Thanks, Dog Whisperer!

The challenge: Bake a cake for Buddy the Spoodle

Not OK for dogs to eat
  • Sugar or sugar substitutes like xylitol
  • Butter, milk, cream, or any other unfermented dairy product
  • Chocolate
OK for dogs to eat
  • Carrots
  • Honey
  • Yogurt
  • Peanut butter
  • Eggs
Given these constraints, I modified a dog cake recipe and a yogurt dog frosting recipe. I topped it off with some dog-safe cake decor: frozen blueberries (I like to buy them fresh and freeze them myself to achieve that "frosted blueberry" look that's all over alphafoodie's Instagram page), a banana ripe enough to shape slices into a rose, and fresh mint leaves.

I loved the process of baking this cake for the following reasons:
  • Humans can eat this cake, too: The cake-for-human s I made for this party was a structural disaster. Fortunately, I made cupcakes-for-humans as a backup. But it was nice knowing that if the cupcakes somehow went kaput, we could eat the cake for dogs. I had a few bites of the dog cake as I was making it - the taste was not amazing but passable.
  • The yogurt-tapioca frosting is easy to use: I've never been one who's had an easy time getting the frosted sides of her cake smooth - it takes me at least 30 minutes of very concerted work with an offset spatula and warm water to get a cream cheese frosting or buttercream cake to look decent. But the yogurt/tapioca combo made the process of frosting this cake a breeze. It was very quick to get a smooth top, sharp edges, and that almost-naked cake look so difficult to achieve with buttercream or cream cheese frosting.
  • It's fun to watch dogs chase after and eat a cake: Presented here without comment.
Here's the recipe!

Buddy's Carrot-Peanut Butter Dog-Safe Cake with Yogurt Frosting
modified from AllRecipes and Entirely Pets

Cake ingredients:
  • 1 egg
  • Vegetable oil
  • 1/4 cup peanut butter
  • 1/3 cup cooking oil
  • 1 tsp vanilla extract
  • 1/3 cup honey
  • 1 cup shredded carrots
  • 1 cup whole wheat flour
  • 1 teaspoon baking soda

Frosting ingredients:
  • 1/2 cup plain Greek yogurt
  • 1/2 cup tapioca starch
  • 2 - 3 teaspoons low fat or 2% milk

Decor:
  • Fresh blueberries (if you like the frosted look a la alphafoodie, throw them into the freezer the night before)
  • Ripe but not brown banana (they need to be just soft enough to shape the slides into a rose)
  • Fresh mint leaves

Directions for the cake:
  1. Preheat oven to 350 degrees F (175 degrees C). Grease two 6-inch cake pans with a vegetable-based oil and line them with parchment paper rounds.
  2. Combine the egg, peanut butter, oil, vanilla, and honey, if desired, in a large bowl; blend well.
  3. Stir in the carrots and mix thoroughly.
  4. Sift together the flour and baking soda and fold into the carrot mixture.
  5. Spoon cake batter into prepared pans.
  6. Bake in preheated oven for 40 minutes.
  7. Let cake cool in pan for 10 minutes; then turn out onto a wire rack to cool completely.

Directions for the frosting:
  1. Place yogurt and tapioca starch in a small bowl and thoroughly combine.
  2. Mix in milk a teaspoon at a time until you achieve the consistency of frosting.

Directions for assembly:
  1. Add a dab of the yogurt frosting to a cardboard cake round.
  2. Once the cakes are cooled, place one of them on the yogurt frosting dab to secure onto the cardboard cake round.
  3. Spoon some frosting on top of the cake. Add the other cake on top.
  4. Spoon the rest of the frosting on top of the second cake and frost the sides.
  5. Decorate the top with blueberries, mint, and banana slices. If feeling ambitious, turn the banana slices into a rose, similar to how you'd make an avocado rose.

Tuesday, February 13, 2018

Couples who mask together last together: Valentine's Day facials with Skin Forum


Valentine's Day is around the corner! It also happens to be my husband's birthday. To help us celebrate, the folks at Skin Forum kindly gifted us two of their signature facial-in-a-box kits. Read on to see how we masked as a couple, and for the backstory on how we discovered Korean skincare!


My husband Marshall is one of those lucky people whose skin is always smooth even when he doesn't do *anything* to take care of it. I'm the opposite: my skin is super acne-prone, sensitive, and high-maintenance. Any variable (whether it's a new product, climate, diet, what have you) can make or break my complexion. He started dating me when I was battling the worst bout of cystic acne of my life - I felt like a frog who'd found her prince. Three rounds of Accutane later, my skin's better today than it was back then, and Marshall's been there for me throughout the entire emotional rollercoaster. I feel so fortunate to call him my husband!

Though Marshall doesn't ruminate over his skin (he's never needed to!), he was wowed by all the flawless skin he saw on the streets of Seoul when we visited in 2015. So we popped into an Olive Young (Korea's version of Ulta - there's one on almost every major intersection in Seoul), and a sales rep helped him craft his first skincare regimen: a cleanser, toner, moisturizer, and sunscreen. The addition of these Korean products has made his skin even smoother and softer than it already was. He still uses the same products today!

While I'm more high-maintenance about my skin than Marshall is, we mask together on occasion. Here we are trying Mediheal's Black Collagen Eye Mask (our verdict: Pleasant smell and convenient to apply. Undereyes appear less wrinkled but it's not groundbreaking.)


We tried the Skin Forum 6-step Facial in a Box on the evening of the Super Bowl (neither of us are into football - we watched "The Office" reruns on Netflix instead). He used the "Hydrating" facial and I tried the "Lift & Firm" facial. I know he looks like he's "over it" in the photo below, but I swear he was ok with our chill evening of self-care!


The six steps of each Skin Forum Facial-in-a-Box are as follows:
  1. Magic cleansing cloth: three cleansing wipes get rid of debris and makeup.
  2. Gentle exfoliating swab: giant black cotton swab soaked with alpha and beta hydroxy acids polishes away dullness.
  3. Advanced soothing toner: white cotton pad soaked with nutritious extracts balances the pH level of skin.
  4. Sheet mask: delivers higher absorption of nutrients in a shorter amount of time, according to New York City aesthetician Jordana Mattioli.
  5. Super serum: vitamin-rich serum enhances the hydration from the sheet mask.
  6. Repairing cream: seals in the facial's effects for all-night hydration and protection.


Stuff we loved about the facial:
  • The illustrated instructions for each step in the fold-out brochure (the products were nestled within the brochure alongside the corresponding illustration).
  • Compact, easy to store, and easy to use, with spa-facial-like effects (no appointment required).
  • The products smelled nice but not overpowering. The hydration sheet mask smelled like vanilla while the lift and firm sheet mask smelled like roses.
  • All products are free of parabens, synthetic colors, petroleum, mineral oil, chemical sulfates, phthalates.
  • Skin-health friendly pH levels in all products (see below for pH details).
  • Our skin felt softer afterwards.
Stuff we didn't love about the facial:
  • Some of the steps (the exfoliating swab in particular) felt a little tingly - not uncomfortable, but if I had any open wounds on my face, it would have stung.
  • I would prefer a more thorough double-cleanse step rather than a mere cleansing wipe - I felt like there was still residue on my face after wiping.
  • The "Lift and Firm" facial gave me a little breakout on my chin and my left cheek. The skin *around* the pimples was divinely soft (almost as soft as Marshall's skin)! But still...pimples. It might be because of the castor oil and citrus oils in the toner - still not sure if these oils help or hurt my acne-prone skin. To be fair, this happens every time I get a facial, too. My skin post-breakout, though, is glowing and clear, so I chalk up the initial breakout to the "purging" stage of a new skincare trial.
Here's the pH breakdown of each product (note I used these pH strips which are not always 100% accurate, but you get a general idea of the pH range):

For the "Lift and Firm" facial:
Step 1: magic cleansing cloth. pH: 6.25
Step 2: gentle exfoliating swab. pH: 4.5
Step 3: advanced soothing toner. pH: 6.5
Step 4: sheet mask. pH: 6.0
Step 5: super serum: pH: 5.5
Step 6: repairing cream. pH: 5.75

For the "Hydration" facial:
Step 1: magic cleansing cloth. pH: 5.5
Step 2: gentle exfoliating swab. pH: 4.5
Step 3: advanced soothing toner. pH: 6.0
Step 4: sheet mask. pH: 5.75
Step 5: super serum. pH: 5.75
Step 6: repairing cream. pH: 6.0


Now let's do a breakdown of the ingredients, and the differences between the "Hydrating" and "Lift and Firm" formulas.

For step 1 (magic cleansing cloth), the ingredient list between the "Hydrating" and "Lift and Firm" varieties was exactly the same. Notable ingredients:
  • Aloe leaf extract
  • Oryza Sativa (rice) extract
  • Galactomyces ferment filtrate (the fungus that's a by-product of sake brewing - a key ingredient in SK-II's famous facial treatment essence)
  • Centella asiatica (Asiatic pennywort plant) extract
For step 2 (gentle exfoliating swab), again, the ingredient list between the "Hydrating" and "Lift and Firm" varieties was exactly the same. Notable ingredients:
  • Aloe leaf extract
  • Lactic acid
  • Citric acid
  • Castor oil
  • Grapefruit extract
  • Lime extract
  • Anise fruit extract
  • Salicylic acid
For step 3 (soothing toner), again, the ingredient list between the "Hydrating" and "Lift and Firm" varieties was exactly the same. Notable ingredients:
  • Grapefruit peel oil
  • Orange oil
  • Bergamot fruit oil
  • Lemon peel oil
  • Paeonia albiflora (Chinese peony) root extract
  • Nelumob nucifera (lotus) flower extract
  • Magnolia liliiflora (purple magnolia) bud extract
  • Lilium tigrinya (lily) extract
  • Piper methysticum (kava) leaf/root/stem extract
  • Mistletoe ferment extract
For step 4 (the sheet mask), the ingredient lists were different between the two facial varieties (finally!).

Shared ingredients:
  • Castor oil
  • Hydrolyzed collagen
  • Witch hazel extract
  • Arginine
Here's where the two masks were different:
  • Hydration
    • Bamboo water
    • Rose water
    • Opuntia ficus-indica (cactus) extract
    • Aloe leaf extract
    • Cucumber extract
    • Jania rubens (red seaweed) extract
    • Raspberry ketone
  • Lift and firm
    • Camellia sinensis leaf extract
    • Panax ginseng root extract
    • Adenosine
    • Allantoin
    • Carbomer
    • Illicit verum (anise) fruit extract
For step 5 (super serum) the ingredient list is exactly the same except the pink one (Lift and Firm) includes palmitoyl pentapeptei-4, Glycerin, and Butylene glycol. Shared ingredients include castor oil, allantoin, arginine.

For step 6 (repairing cream), the ingredient lists are identical except
  • "Hydration" contains Sodium Hyaluronate
  • "Lift and Firm" contains palmitoyl Pentapeptide-4
Shared ingredients include arginine and carbomer.

The low pH values (note that the ideal pH of skin mantle is 5.5 - so low pH aka on the acidic side) made this set very hydrating and softening. Not sure if it had much lifting or firming action. As I mentioned above, even though my skin was softer, I did have a few breakouts on my chin and cheek after trying this facial - the skin *around* the pimples was super soft though!


I may have experienced a small breakout afterwards, but I still loved trying these facials with my husband. We wiped our faces, patted on serums and toners, slapped on masks, and moisturized our hearts out, all while relaxing on the couch in front of the TV. So much less fussy than having to schedule and book a couple's facial! We loved the illustrated instructions provided in the fold-out brochure in which the products were nestled and helping each other with our sheet masks. It's the mundane moments like these that bring us even closer.

You can score a facial-in-a-box for yourself at theskinforum.com ($20 per month for one kit; $50 per month for three kits). Happy Valentine's Day, and happy masking!
Friday, January 5, 2018

Taking the guesswork out of flatlay photography


tl;dr - You don't need fancy equipment or even a tidy living room to take a professional-looking flatlay photo. Read on for my step-by-step guide to easy DIY flatlay photography!


So...you want pretty flatlays?
Whether you're up-leveling your Instagram, building a brand, or documenting your everyday in style, you too can take professional-looking flatlay photos - and you won't need to hire a photographer or buy fancy equipment to do it. Read on to learn how!

Before we begin, below is the final photo from the step-by-step I’m about to outline in this post:


Disclaimer: I'm not a professional photographer, but I have a deep admiration (some would say obsession!) for pretty pictures. I have rough general ideas about what looks good and what doesn't look good, but that's about where my formal photography edumacation ends. It's all about practice and patience. If I can do it, you can too!

Step 1: Gather your stuff
  1. A room with natural light
  2. Camera (smartphone camera works great! I use a phone camera for all my photos.)
  3. Flat, matte background to shoot against
  4. Subject(s) to photograph
  5. Props
  6. Optional: scotch tape to keep round elements from rolling around
  7. Mobile apps for editing your photos
Want more details and ideas on what you can use in your flatlay photos? Check out the breakdown at the end of this post here.

Here’s everything I used for the DIY in this post:
On the left: My messy living room - still A-OK for taking clean-looking flatlay photos!
On the right: Everything I used for the flatlay in this tutorial

Step 2: Shoot your photos
Here are some tips to make your flatlay photo sesh fun, painless, and productive:
  • Keep a steady hand. I rest my wrist on something stationary like a stool or a table when I shoot.
  • Never shoot with flash. You don't need it when there's already natural light, and flash tends to flatten textures and produce harsh shadows.
  • Turn off the "live" feature on iPhone. I’ve found it difficult to get as sharp of an image as I’d like when I use the “live” feature. You can turn this feature off by tapping the circular icon in the center of the top part of the native camera app. Make sure that icon is white, not yellow (yellow means it's on - at least for the iPhone 7! I can't speak for y'all early adopters of iPhone 8 and whatever newfangled technologies you kids are using at the time you're reading this).
  • Shoot in HDR mode. HDR stands for "High Dynamic Range" and while I'm not familiar with the scientific details around why HDR photos turn out better, I just know they do. HDR photos have cleaner, more vivid details. Check out this blog post from Corel for more details on how HDR works. On iPhone 7, you can turn on HDR by tapping the “HDR” in the upper left part of your camera phone app - if the letters are yellow, HDR mode is on.
  • Clean your lens. Before you shoot, gently wipe the lens with a soft cloth to get rid of dust debris.
  • Shoot with a perfect flat angle using Foodie. The Foodie app has a built-in level that helps you get a perfectly flat, non-tilted angle. When you're perfectly level, the lower border turns yellow. It looks like this in action:


  • Take many shots and experiment. Here are some elements you can change up:
    • aspect ratios (vertical, horizontal, square)
    • how close you are to your subjects when you take the photos
    • shadow placement (I like to rotate my flatlay background to see what kinds of shadows I can get)
    • placement of my subject and props
    • number of props to include (note that an odd number of elements tends to look nicer in flatlays)
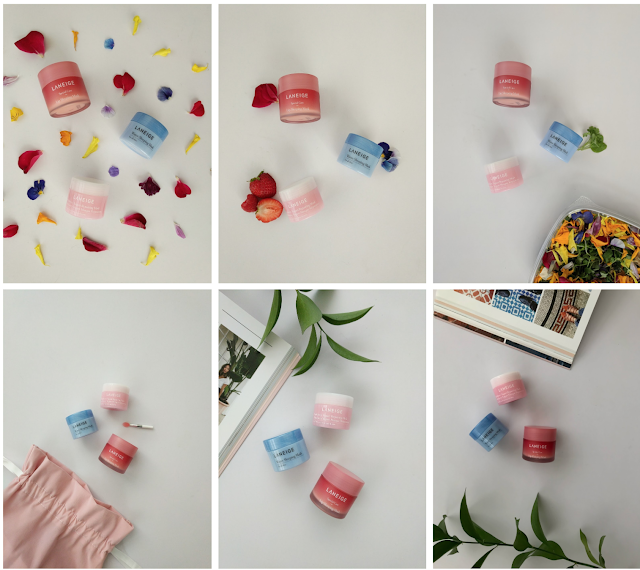
    Remember: sometimes, stuff you don't think would look good ends up looking awesome. I experimented with different props and layouts for these Laneige products before I settled upon the coffee table book and Israeli ruscus combination - check out the carnage!


Step 3: Edit your photos
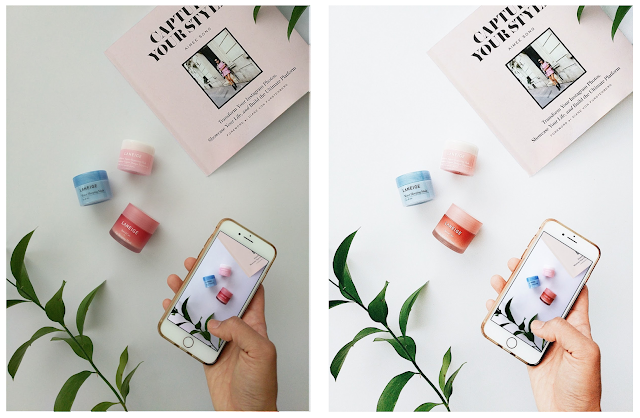
Once you have your photos, it's time to edit! Editing can make a big difference in the "wow" factor of your final flatlay. Check out my dramatic before-and-after from this DIY:


I love starting my edits in VSCO. I use the A6 filter and make adjustments in brightness, contrast, saturation, clarity, sharpness, and temperature until I'm happy with the look, and I feel like it's consistent with my blog and Instagram aesthetic.

Here’s my general VSCO editing formula (I almost always deviate from this, but this is where I start):
  • A6 filter
  • +2 Brightness
  • -1 Contrast
  • +2 Sharpness
  • +1 Clarity
  • +1 Saturation
  • +1 Tint
Next, I use Snapseed to adjust brightness, saturation, and temperature in specific areas of the photo. I use the "Selective" tool to make general areas of the photo brighter, and the "Paintbrush" tool when I want to be very granular about edits, e.g., making the leaves on a plant look greener.

As needed, I use Facetune to mask out stains in a solid background or clean up crumbs in food photos. I use the "Patch" tool for this - it's kind of like copying and pasting parts of your photo to patch up another part of your photo. I also use the “Details” tool sparingly to make textured details like leaves, flower petals, lettering, or jewelry stand out.

Step 4: Bask in your flatlay glory
Here’s the result of all the gathering, shooting, and editing I did to capture these Laneige skincare products:


And there you have it! I hope these tips help you take clean, professional-looking flatlay photos (and have some fun in the process!).

Again, I'm no expert - if I can do it, so can you. You don't need a ton of money to make beautiful flatlays, but practice, experimentation, and patience go a long way when it comes to photography of any kind. Maybe you start out taking 100 photos to produce one you're happy with - you'll start to generate more photos you like per session as you practice more!

Happy flatlay-ing!


Everything you need for a great flatlay: A breakdown
  • A room with natural light
    Take your photos in a room with at least one window that lets in natural light. I like to shoot within a few hours after sunrise or before sunset for filtered sunlight.
  • Camera
    A smartphone camera works great! The vast majority of photos in my Instagram feed are taken with a smartphone camera. I use iPhone 7, the Google Pixel, and Samsung Galaxy S3.
  • Flat, matte background
    For the flatlay background, it's critical that this surface be matte, not shiny - a shiny flatlay surface will produce harsh shadows and reflections. Here are some ideas for inexpensive, easy-to-find flatlay backgrounds:
    • White foam board. It’s cheap and available everywhere. Cover the foam board with white parchment paper if you’re doing a flatlay with wet elements, e.g., cosmetic or skincare product drips, fresh fruits and vegetables. I took both photos below against a parchment-covered white foam board.

    • Painted foam board. You can paint over a foam board with acrylic paint to create any solid color background you’d like. I recently salvaged a dirty foam board by painting it over the dirt with pink acrylic, and you can check out some of the photos I’ve taken with the painted board below.

    • Chalkboard. I love this chalkboard from Amazon because it's dual-sided: black on the front, white on the back. I'm using the white side of the chalkboard for this post’s DIY. The front of the chalkboard comes in handy when I want a more interesting dark background - I use colored chalk to add texture to the chalkboard, especially for food glamour shots. See either side of the chalkboard and a food glamour shot against the dark side of the chalkboard below.

    • Wooden table or floor. I love the cozy, rustic feel of a wooden background. Plus, white/pale objects pop more against wood than they they do against a white background. The photos below were taken on two different wooden tables.

    • Marble contact paper-covered foam board. Real marble tends to be expensive, heavy, and too shiny. You can fake it by purchasing matte marble contact paper and covering a foam board with it, as I’ve done in both of the photos below.

    • White bed sheet - the "breakfast in bed" look. I have a spare white flat bedsheet I keep folded in my closet, and I spread it out to take photos. No worries about wrinkles in the sheet - they add texture to your flatlay! Case in point below.
Subjects to photograph
I typically photograph sweets and skincare products! Sheet masks in particular are fun to photograph because there's so much surface area, and the packaging tends to be fun and creative.

Other ideas for subjects:
  • folded-up clothing and shoes/accessories
  • cosmetics and personal care products
  • stationery, greeting cards, laptop/tablet, and office supplies
  • luggage and transit accessories, e.g., passport wallet
  • food, cooking tools, plates, and utensils

Props
Note that a lot of stuff I mentioned in the "subjects" section could also serve as props!

Here are some of my favorite flatlay props:
  • hands in the shot (I like to wrap my hands around a coffee mug)
  • tea or coffee in a cup with a saucer
  • macaron cookies
  • loose foliage like monstera leaves and Israeli ruscus which last a long time in water
  • small potted plants - I like succulents and cacti
  • flowers (I love fresh flowers, but they die quickly) – I keep some cheap silk flowers from the local crafts store on hand to add more volume to fresh flowers. I tend not to shoot with only silk flowers.
  • cloth napkins or folded cloth to add texture (I keep a white pillowcase on hand for this purpose)
  • coffee table books – staples include Capture Your Style by Aimee Song, cookbooks of all sorts, black and white magazines, newspapers in coffee / breakfast-in-bed shots
  • if you need more elements in your photo, take a photo of the flatlay on another phone and display that phone with the photo in your final shot for some recursive / meta fascination
Saturday, December 23, 2017

Skincare resolutions: SkinForum's Botanical Fuse Sheet Masks


tl;dr - SkinForum's Lavender Botanical Fuse mask hydrated and calmed my dry, irritated skin during the cold winter season. Use the promo code "thejenproject15" at theskinforum.com to get 15% off any purchase*!


Got resolutions for 2018? I'm still poring over what my 2018 vision looks like, but daily sheet masking is definitely in there - it's the best way to keep my skin hydrated, and it just feels good. 20 minutes of "me" time is never a bad thing, right?

So I'm happy to close 2017 with a new line of sheet masks I'm trying. Chock full of botanicals like lavender, green tea, and grapefruit, SkinForum's Botanical Fuse sheet masks are gentle enough to use everyday, and there's something for every skin type or concern. The sheets are made out of a biodegradable cotton tencel that conforms to your face like a glove. I was lucky to receive the sheet masks below c/o SkinForum:


I love the convenience of being able to put fruits and herbs on my face instantly through a sheet mask (no washing or chopping needed) - reminds me of when my mom placed sliced cucumbers on my face when I was a kid after swim meets.

With the days getting colder and drier, I needed something to moisturize and soothe my dry, flaky, and somehow still acne-prone skin. Y'all know how it is when you've got combination skin. I'd also just gotten some raised dark spots lasered off at the dermatologist, which made my skin more sensitive and sore. So I immediately gravitated toward the lavender-scented variety of this sheet mask. It's touted as a "blanket for the skin" which sounded perfect to relieve my irritation! In addition to lavender, the mask contains chamomile, aloe, rosemary, and raspberry extracts for maximal relaxation.

How I used it
  1. Took off eye makeup with jojoba oil (anything else irritates my eyes and leads to weird monolid/double lid creasing asymmetry)
  2. Removed face makeup with The Face Shop Mango Seed oil cleanser
  3. Washed off residue with Cerave Hydrating Cleanser
  4. Toned with L'Occitane Immortelle Essential Water
  5. Slapped on mask with the intention of taking it off after 20 minutes - ended up falling asleep in it and waking up 7 hours later (oops)
Observations
  • Essence has the viscosity of a serum: not runny, but not as thick as the gooey honey-like essence from Common Labs Ggultamin masks
  • Smells like lavender - very fresh and fragrant
  • Tingled upon application and continued to tingle for the duration of wear - felt like there was menthol in the essence
  • Great adhesion! No bubbling, and the sheet clung to my face even as I walked around the house and slept on my side
  • The sheet mask fell off as I was sleeping which is to be expected
  • In the morning, the sheet was still slightly damp - dang, that essence has great moisture retention
Morning routine after using the sheet mask
  1. Washed with St. Ives Apricot Blemish Control Scrub in the shower
  2. Toned with L'Occitane Immortelle Essential Water
  3. Added a thin layer of Aczone (RX) since I've been acne prone lately
  4. Topped it off with L'Occitane Shea Butter Light Comforting Cream
  5. Layered La Roche Posay Anthelios Tinted Mineral Sunscreen SPF 50 on top
  6. Applied NARS Radiant Creamy Concealer in Ginger and Neutrogena Mineral Sheers Pressed Powder in Natural Beige 60 over the entire thing to cover up the dark spots from a recent lasering session with my dermatologist (she zapped the raised dark spots I had due to genetics - saving those details for another post)
The verdict?
After using the lavender sheet mask, my irritated skin felt calmer, and I finally had no flakiness or oiliness (a miracle during these winter months!). What's an even bigger miracle is that I didn't even apply moisturizer before going to bed, but the sheet mask appears to have moisturized it enough. Plus I loved the experience of wearing a tingly, fragrant mask - clearly, I loved it so much that I fell asleep in it. The only downside is the inclusion of castor oil, which is likely not an issue for normal skin types, but I was worried because I'm so acne-prone. Haven't gotten any zits yet, so I'm guessing the castor oil was only present in minute quantities.

And I don't know if it's because it's the holidays, but I definitely felt like I had a glow after trying this lavender mask - see my unfiltered during-and-after sheet mask selfies below.


I can't wait to indulge with the other masks in this line! I've got citrus, herb, charcoal, and oxygen bubble left to try - stay tuned on my Instagram where I'll post reviews of the others. You can use the promo code "thejenproject15" at theskinforum.com to try these masks (or any of their others!) for 15% off*.

Which sheet mask are you most excited to try in 2018?

*Excludes subscription boxes